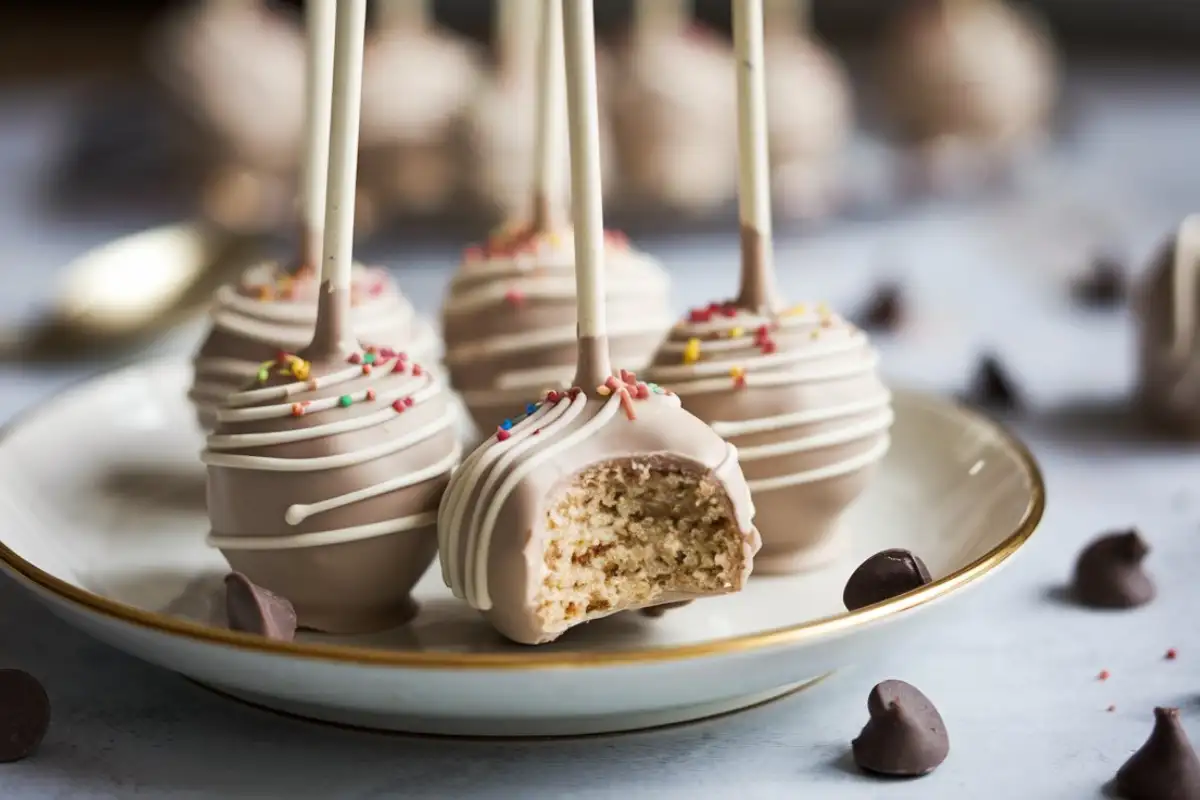
How do you make cake pops stick to the stick? This question plagues many home bakers and dessert enthusiasts who have tried their hand at this trendy and delightful treat. Cake pops have become a popular choice for parties, celebrations, and events, offering a bite-sized treat that’s as fun to make as it is to eat. However, one common challenge that often arises is ensuring that the cake pops stay securely on the stick. A perfectly shaped and beautifully decorated cake pop can easily be ruined if it slips off or wobbles during dipping, drying, or serving.
In this comprehensive guide, we’ll explore the various techniques and tips to ensure your cake pops stay firmly attached to the stick from start to finish. From choosing the right ingredients to mastering the dipping process, you’ll learn everything you need to create perfect, professional-looking cake pops every time.
Understanding the Basics of Cake Pops
Cake pops are essentially small, round confections made by combining crumbled cake with a binder, such as frosting or cream cheese, to form a dough-like mixture. This mixture is then shaped into balls, attached to a stick, dipped in a coating, and decorated as desired. While the concept seems simple, making cake pops that not only taste great but also stay intact on the stick requires some attention to detail.
The challenge of making cake pops stick to the stick is one of the most common problems bakers face. This issue can be caused by several factors, including the texture of the cake mixture, the type of stick used, and the method of coating and decorating the cake pops. Understanding these factors is the first step toward mastering the art of cake pop making.
Choosing the Right Ingredients
The Importance of Proper Cake Consistency
The consistency of the cake mixture plays a crucial role in ensuring that cake pops stay on the stick. If the cake is too dry or too moist, it can affect the structural integrity of the cake pop. Ideally, you want a cake that is moist enough to hold together when crumbled but not so wet that it becomes mushy.
To achieve the perfect consistency, start by baking a cake that is slightly denser than your typical fluffy cake. Avoid using oil-heavy cakes, as they tend to be too moist for cake pops. Once the cake is baked and cooled, crumble it finely. The finer the crumbs, the better the mixture will hold together.
Binding Agents: What Works Best?
Binding agents are the key to transforming crumbled cake into a dough-like mixture that can be shaped into balls. Common binding agents include frosting, cream cheese, and condensed milk. The choice of binder depends on your taste preference and the desired consistency of the cake pop mixture.
Frosting is the most commonly used binder, offering sweetness and creaminess. However, it’s essential to use it sparingly. Too much frosting can make the mixture too soft, causing the cake pops to fall off the stick. Cream cheese adds a tangy flavor and works well with less sweet cakes. Condensed milk is another option that provides a rich, sweet binder that holds the cake mixture together.
When mixing the binder with the crumbled cake, add it gradually until the mixture reaches a dough-like consistency that holds its shape when rolled into a ball. Avoid overmixing, as this can make the cake pops too soft.
The Role of Chocolate or Candy Coating
The coating used for cake pops serves both an aesthetic and functional purpose. It adds flavor, creates a smooth surface for decorating, and most importantly, helps keep the cake pop on the stick. Chocolate and candy melts are the most popular coatings for cake pops, but each has its pros and cons.
Chocolate provides a rich, indulgent flavor and a shiny finish but can be more challenging to work with due to its need for tempering. Candy melts, on the other hand, are easier to handle and come in various colors, making them ideal for decorating. However, they may not have the same rich flavor as real chocolate.
For beginners, candy melts are a good choice because they don’t require tempering and have a smooth consistency that’s perfect for dipping. Whichever coating you choose, ensure it’s melted to the right consistency—not too thick and not too thin—to achieve the best results.

Preparing the Cake Pop Mixture
Crumbing the Cake: The First Step
To begin making cake pops, start by crumbling the baked and cooled cake into fine crumbs. This step is crucial because the consistency of the crumbs will determine how well the cake pop mixture holds together. Large chunks of cake can create uneven texture and make it difficult to form smooth, uniform balls.
Use your hands or a food processor to achieve fine crumbs. If you’re using your hands, ensure that all the crumbs are uniform in size. If using a food processor, pulse the cake until it resembles coarse sand. The finer the crumbs, the easier it will be to mix in the binding agent and form cake balls.
Mixing in the Binding Agent
Once you have fine cake crumbs, it’s time to add the binding agent. Start by adding a small amount of your chosen binder—whether it’s frosting, cream cheese, or condensed milk—and mix it into the crumbs. The goal is to achieve a dough-like consistency that holds its shape when rolled into a ball.
Add the binder gradually, mixing it in with your hands or a spatula. Be careful not to add too much at once, as this can make the mixture too soft and sticky. If you accidentally add too much binder, you can compensate by adding more cake crumbs.
Once the mixture is well-combined, test it by rolling a small amount into a ball. It should hold its shape without cracking or being too sticky. If it’s too crumbly, add a bit more binder. If it’s too sticky, add more cake crumbs.
Forming the Perfect Cake Balls
With the cake pop mixture ready, the next step is to form the cake balls. Use a small cookie scoop or a tablespoon to portion out the mixture evenly. This ensures that all your cake pops are the same size, which helps with uniform coating and decorating.
Roll each portion of the mixture between your palms to form a smooth, round ball. Avoid pressing too hard, as this can make the cake pops too dense. If you notice any cracks, gently reshape the ball until it’s smooth.
Place the formed cake balls on a baking sheet lined with parchment paper and let them chill in the refrigerator for at least 30 minutes. Chilling the cake balls makes them firmer and easier to handle during the dipping process.
Preparing the Sticks
Choosing the Right Stick
Choosing the right stick for your cake pops is crucial for stability and ease of handling. The most commonly used sticks are lollipop sticks, skewers, and paper straws. Lollipop sticks are the standard choice, available in various lengths and thicknesses. Skewers can be used for larger cake pops, while paper straws add a decorative touch.
When selecting sticks, consider the size and weight of your cake pops. For smaller cake pops, standard lollipop sticks work well. For larger or heavier cake pops, opt for thicker sticks or skewers to provide better support.
Dipping the Stick in Coating
One of the most effective techniques to ensure cake pops stay on the stick is to dip the stick in melted chocolate or candy coating before inserting it into the cake ball. This step acts as a “glue” that helps anchor the cake ball to the stick.
To do this, dip about 1/2 inch of the stick into the melted coating, then insert it into the center of the cake ball. Push the stick about halfway into the cake ball, being careful not to go too deep, as this can cause the ball to split. The coating on the stick will harden as it cools, securing the cake ball in place.
Inserting the Stick into the Cake Ball
When inserting the stick into the cake ball, it’s essential to do so with a steady hand to avoid damaging the ball. Hold the cake ball gently and push the stick in slowly and straight, ensuring it’s centered and secure.
If you’re making a large batch of cake pops, it’s a good idea to dip and insert the sticks for all the cake balls before moving on to the next step. This allows the coating on the sticks to set properly, giving you a stronger hold when it’s time to dip the entire cake pop in the coating.

Chilling and Setting the Cake Pops
The Importance of Chilling
Chilling the cake pops before dipping them in the final coating is a crucial step that helps them stay on the stick. Chilling firms up the cake balls, making them less likely to fall apart during the dipping process. It also allows the coating on the stick to fully set, creating a stronger bond.
Place the cake pops in the refrigerator for at least 30 minutes after inserting the sticks. For even better results, you can chill them in the freezer for 15 minutes, but be careful not to freeze them completely, as this can cause the coating to crack when the cake pops are dipped.
Avoiding Condensation Issues
One common problem when working with chilled cake pops is condensation. When you take the cake pops out of the refrigerator, the change in temperature can cause moisture to form on the surface. This moisture can make it difficult for the coating to adhere properly and can cause the cake pops to slide off the stick.
To prevent condensation, avoid taking the cake pops directly from the refrigerator to a warm room. Instead, let them sit at room temperature for a few minutes to adjust. If you notice any condensation, gently dab the cake pops with a paper towel before dipping them in the coating.
Dipping and Coating the Cake Pops
Preparing the Coating
Before dipping your cake pops, it’s essential to prepare the coating properly. Whether you’re using chocolate or candy melts, the coating should be melted to a smooth, pourable consistency. If the coating is too thick, it can make dipping difficult and cause the cake pops to fall off the stick.
Melt the coating in a microwave-safe bowl or a double boiler. If the coating is too thick, you can thin it out by adding a small amount of vegetable oil or paramount crystals. Mix well until the coating is smooth and fluid, but not so thin that it won’t adhere to the cake pops.
Dipping the Cake Pops
Now comes the most critical part: dipping the cake pops. Hold the cake pop by the stick and dip it into the melted coating, ensuring that the entire cake ball is submerged. Do not swirl or stir the cake pop in the coating, as this can cause it to fall off the stick.
Once the cake pop is fully coated, lift it out of the coating and gently tap the stick on the edge of the bowl to remove any excess. Rotate the cake pop as you tap to ensure an even coating. This step requires a gentle touch to avoid dislodging the cake ball from the stick.
Tapping Off Excess Coating
After dipping, it’s crucial to remove any excess coating to achieve a smooth finish. However, be careful not to tap too hard or too long, as this can cause the cake pop to slide off the stick. Gently tap the stick on the edge of the bowl while rotating the cake pop until the excess coating drips off.
If you notice the cake pop starting to slide, stop tapping immediately and hold the cake pop upright for a few seconds to allow the coating to set slightly. This will help prevent the cake pop from falling off the stick.
Decorating and Final Touches
Adding Sprinkles and Other Decorations
Decorating your cake pops is where you can get creative. Sprinkles, edible glitter, and other decorations can add a fun and festive touch to your cake pops. The key to successful decorating is timing—add decorations while the coating is still wet so they stick properly.
After dipping and tapping off excess coating, immediately sprinkle your chosen decorations over the cake pop. You can hold the cake pop over a bowl to catch any excess sprinkles. For more intricate designs, you can use a piping bag filled with melted coating to create patterns or add details.
Drying and Setting the Cake Pops
Once decorated, the cake pops need to dry and set. The best way to do this is to place the sticks in a styrofoam block or cake pop stand, allowing the cake pops to dry upright without touching any surfaces. This ensures the coating sets evenly without any smudges or flat spots.
Let the cake pops dry at room temperature until the coating is completely set. Depending on the type of coating used, this can take anywhere from 10 minutes to an hour. Once dry, the cake pops can be stored in an airtight container at room temperature or in the refrigerator.
Final Quality Check
Before serving or packaging your cake pops, it’s a good idea to perform a final quality check. Gently press on the cake pop to ensure it’s securely attached to the stick. Inspect the coating for any cracks or imperfections and make any necessary touch-ups.
If you’re planning to transport the cake pops, ensure they’re stored securely to prevent them from shifting or falling off the stick during transit. For long-term storage, keep the cake pops in an airtight container to maintain freshness and prevent the coating from absorbing moisture.
Common Mistakes and How to Avoid Them ?
Overmixing the Cake and Binder
One common mistake when making cake pops is overmixing the cake and binder, which can result in a mixture that’s too soft and prone to falling off the stick. To avoid this, add the binder gradually and mix just until the mixture holds together.
If you find that the mixture is too soft, try adding more cake crumbs to balance it out. The goal is to achieve a dough-like consistency that’s firm but not too dense.
Using the Wrong Stick
The type of stick you use can significantly impact the stability of your cake pops. Using sticks that are too thin or too short can make it difficult for the cake pops to stay in place, especially during the dipping process.
Choose sticks that are the appropriate length and thickness for your cake pops. Lollipop sticks are the most reliable choice, but skewers or paper straws can also work if they’re sturdy enough to support the weight of the cake pop.
Inadequate Chilling Time
Rushing the chilling process is another common mistake. If the cake pops aren’t chilled long enough, they may not be firm enough to hold together during dipping. Ensure you give your cake pops enough time to chill thoroughly before moving on to the coating step.
If you’re short on time, you can chill the cake pops in the freezer for a short period, but be careful not to freeze them completely. Freezing can cause the coating to crack as the cake pops come back to room temperature.
Advanced Tips for Ensuring Cake Pops Stick to the Stick
Experimenting with Different Coatings
For those looking to take their cake pops to the next level, experimenting with different types of coatings can yield impressive results. For example, using tempered chocolate can provide a glossy finish and a firm shell, while candy melts offer vibrant colors and ease of use.
You can also try double-dipping your cake pops for extra security. After the first layer of coating has set, dip the cake pops a second time to create a thicker shell that’s less likely to crack or slide off the stick.
Incorporating Extra Support with Decorative Elements
Another advanced technique is to use decorative elements as additional support for the stick. For example, you can use a small piece of fondant or edible glue to secure the stick at the base of the cake pop. This not only adds stability but also allows you to get creative with the presentation.
For larger cake pops, consider adding a small decorative element, like a fondant flower or bow, at the base of the stick to help hold it in place. This not only enhances the look of the cake pop but also provides extra support.
Professional Baker Secrets
Professional bakers have their own set of tricks for ensuring perfect cake pops. One common technique is to use a cake pop mold to achieve uniform size and shape. This ensures that all your cake pops are the same size, making them easier to coat and decorate evenly.
Another secret is to use a high-quality dipping tool, such as a cake pop fork or dipping spoon, to support the cake pop during the dipping process. This reduces the risk of the cake pop slipping off the stick and allows for more precise dipping.
Conclusion
In conclusion, making cake pops that stick to the stick requires attention to detail, from the consistency of the cake mixture to the technique used for dipping and coating. By following the tips and techniques outlined in this guide, you can create perfect cake pops that are not only delicious but also stay securely on the stick.
Remember to experiment with different methods and find what works best for you. With practice, you’ll become a cake pop pro in no time. So go ahead, get creative, and enjoy making your own delicious and visually stunning cake pops!


